No. Not from my house, Silly. Blog sites!
You can find me here:
http://diligentdesigner.com/
See you on the other side!
Thursday, August 7, 2014
Monday, July 28, 2014
Drywall and Shout-Outs.
I shall make my intro quick. Drywall. Check. Texture. Check. Paint. Check. Electric trimmed out. And, makeshift kitchen. Check. View below, y'all!


Okay. Either I did not take pictures of the finished drywall before putting up electrical trimming or I deleted them. So, Jump forward and here is my lovely temporary kitchen. When I say lovely. I mean LOVELY. I have never been so thankful for a garbage disposal, dishwasher and working electrical outlets in my life.
Our microwave and toaster oven kept tripping out our functioning electrical outlets throughout the rest of the house and my husband didn't want to mess with the electrical box. So, we dragged extension cords throughout when I needed to vacuum, cook (with a low voltage cook top), or do laundry. Good times.


The Italian, island ventilation hood was apparently manufactured to only fit at least nine foot ceilings. That, or Europeans maybe like to cook with a hood in their face. Our contractor Danny had a heck of a time tweaking it to a 32" (30"-36" recommended) height, but he made it work.

I'd like to give a few shout outs to some of my new "friends." First off, garbage disposal.

Next, hey you, 30 year beat up ol' cabinets....

I didn't forget you stapled plastic wrap over my flatware.....

And, you. tilted pantry. I will desire you, so long as you don't take a stumble into New Fridge over there.

In all your duct taped glory.

And, lastly, you, uninstalled dishwasher. I don't care if you tilt every time I open your door. You care for me and four hungry males....and your steam option....well, heh, that just puts a smile on my face.

Cabinets in next week. Stay tuned!
Saturday, July 19, 2014
After much anticipation. Kitchen Remodel Begins!
So, here we are. After about 5 years of saving money and patiently waiting, our kitchen remodel has begun. I am a little late in posting about the progress as we have no electricity on the desktop side of the house, so I will let my photos do the talking.
If you can remember the before. On the other side of that fridge wall is my dining room.

Right here.


First demo for the boys to participate in.

My youngest excels in photo bombing.


Where the kitchenette used to be.

"Why hello, Kitchen." says, Dining Room.

"Why, hello, Dining Room." says, Fireplace Room.


If you can remember the before. On the other side of that fridge wall is my dining room.
First demo for the boys to participate in.
My youngest excels in photo bombing.
Here is that ol' fridge wall again.
Where the kitchenette used to be.
"Why hello, Kitchen." says, Dining Room.
"Why, hello, Dining Room." says, Fireplace Room.
Meanwhile, in the front yard......
Next week, on the agenda, is drywall, texture, and trimming out all the electrical outlets. Cabinets do not arrive until August 5th, so still much more to come!
Saturday, June 22, 2013
New Steel Security Door
Warning: This post is kinda wordy ;) I thought it might be helpful to understand my process of finding good tradesmen on Craigslist.
Finding a person who specializes in a specific trade can be daunting. Seven of our home projects I have turned to Craigslist, and with the exception of one, I have been really pleased with the results. My trade seeking developed after a major freak hail storm that hit our area hard about three years ago. Since then, I have discovered skilled workers to refinish the cool deck around our pool (that one is my exception...really wasn't the best job), an AlumaWood pergola, upholstery for two wingback chairs my mom gave us, wood window shutters, our massive built in book shelves and storage, our home security system and finally our new steel security door. I had to write a post about the security door, because I am so pleased at the results.
So, my method basically works like this: I get a really good idea of what I am looking for. "A good idea" entails pictures, colors, dimensions, materials, price range, etc.. For example, the cool deck repair, I had dozens of pictures taken from the Internet of what I was looking for and somewhat of an idea about cost. Next, I contact as many tradesmen that I think will be a good fit in terms of 1) price (for our budget), 2) quality (usually have a portfolio of previous work completed), and 3) service (generally this is fast response time, trust, and communication).
Specifically, for this door, I originally saw a special order door at Lowes. I've had my eye on it for about 2 years now as the purchase was not much of a priority. Well, our neighbors were just recently robbed (we live in a descent neighborhood--our last neighbor lived in the same house for 11 years by herself with no trouble at all!), so it seemed like a reasonable time to purchase a security door and beef up our home security alarm system. Back to the door. I knew from a bit of research that there are basically two frame types for security doors: Laser cut and the thicker steel bars. You can customize the interior covering of the frame to be glass, a lighter screen that is flexible or a hard steel mesh screen. The Lowes door was by a local company called Titan and their quote for a laser cut door with the hard steel mesh was a little over $1,800. Our budget needed to be under $800 for materials and install. The hunt began.
I started emailing 5 different people off of Craigslist. One email looked like this:

Please let me know when you can.
Thanks,
Ashley
Easy, right?
Then, the emails came. We went with a gentleman located near us that gave us an estimate in our budget and seemed eager to show us his quality at his own home. Obviously, you do not want to go to some stranger's house alone. My husband and I stopped by his house and were pleased with his work. He was ready immediately to come over and measure. He followed us home and we went over colors, placement and handle options. He said it would be ready in about a week! Shocking because Titan was going to take at least 6 weeks to be ready for install.
Anyways, let us get to the pictures!


Loooove the way the light shines in through the inside.


Isn't it kinda art deco, kinda craftsman, kinda modern? Can you get a little sense of Frank Lloyd Wright?
One thing we noticed upon meeting Oliver, is that he is a perfectionist. Remember, I gave him a teeney picture from the internet. From there he formulated three CAD configurations of what the door would look like.

Not only is he a perfectionist, but this man works HARD. He arrived at our home for install around 10:00 am with his trailer and I am baffled as to how he was able to get this beast of a door to our front porch alone (I offered to help, but he refused). He left about 3:00 pm because the door had to be.....perfect. And, it really is. I can be a tad ;) critical when it comes to design and structural details and design wise it is beautiful. Structurally is closes BEAUTIFULLY. If you know how tricky doors can be to install, the "open" and "close" really determines the accuracy of measurements and levelness (if that's a word) of a structure.
I am including Oliver's contact information if you are in need of a metal tradesman. Note: Oliver did not ask for me to write this or is compensating me for writing it (though he did offer!). He is really just that good. Contact through Craigslist Here. Or through his website Here.
I wish the weather wasn't so hot. I am eager to keep the wood entry door open all the time so I can look at it from the inside.....but, that would be a wasted foolish expense! An Arizona November cannot come soon enough. I'll just keep walking outside to look at it from the street.
Thanks, Oliver! You are an artist!
Also, if you would like contact information in Arizona for wood window shutters or home security systems feel free to email me.
Finding a person who specializes in a specific trade can be daunting. Seven of our home projects I have turned to Craigslist, and with the exception of one, I have been really pleased with the results. My trade seeking developed after a major freak hail storm that hit our area hard about three years ago. Since then, I have discovered skilled workers to refinish the cool deck around our pool (that one is my exception...really wasn't the best job), an AlumaWood pergola, upholstery for two wingback chairs my mom gave us, wood window shutters, our massive built in book shelves and storage, our home security system and finally our new steel security door. I had to write a post about the security door, because I am so pleased at the results.
So, my method basically works like this: I get a really good idea of what I am looking for. "A good idea" entails pictures, colors, dimensions, materials, price range, etc.. For example, the cool deck repair, I had dozens of pictures taken from the Internet of what I was looking for and somewhat of an idea about cost. Next, I contact as many tradesmen that I think will be a good fit in terms of 1) price (for our budget), 2) quality (usually have a portfolio of previous work completed), and 3) service (generally this is fast response time, trust, and communication).
Specifically, for this door, I originally saw a special order door at Lowes. I've had my eye on it for about 2 years now as the purchase was not much of a priority. Well, our neighbors were just recently robbed (we live in a descent neighborhood--our last neighbor lived in the same house for 11 years by herself with no trouble at all!), so it seemed like a reasonable time to purchase a security door and beef up our home security alarm system. Back to the door. I knew from a bit of research that there are basically two frame types for security doors: Laser cut and the thicker steel bars. You can customize the interior covering of the frame to be glass, a lighter screen that is flexible or a hard steel mesh screen. The Lowes door was by a local company called Titan and their quote for a laser cut door with the hard steel mesh was a little over $1,800. Our budget needed to be under $800 for materials and install. The hunt began.
I started emailing 5 different people off of Craigslist. One email looked like this:
Hi There,

If you are able, we are looking to get an approximate estimate for an standard (36" x 80") entry security door. I am looking for a style similar to this:
Please let me know when you can.
Thanks,
Ashley
Easy, right?
Then, the emails came. We went with a gentleman located near us that gave us an estimate in our budget and seemed eager to show us his quality at his own home. Obviously, you do not want to go to some stranger's house alone. My husband and I stopped by his house and were pleased with his work. He was ready immediately to come over and measure. He followed us home and we went over colors, placement and handle options. He said it would be ready in about a week! Shocking because Titan was going to take at least 6 weeks to be ready for install.
Anyways, let us get to the pictures!


Loooove the way the light shines in through the inside.


For paint color we went with Rust-Oleum Multicolor Texture in Rustic Umber.


Isn't it kinda art deco, kinda craftsman, kinda modern? Can you get a little sense of Frank Lloyd Wright?
One thing we noticed upon meeting Oliver, is that he is a perfectionist. Remember, I gave him a teeney picture from the internet. From there he formulated three CAD configurations of what the door would look like.

Not only is he a perfectionist, but this man works HARD. He arrived at our home for install around 10:00 am with his trailer and I am baffled as to how he was able to get this beast of a door to our front porch alone (I offered to help, but he refused). He left about 3:00 pm because the door had to be.....perfect. And, it really is. I can be a tad ;) critical when it comes to design and structural details and design wise it is beautiful. Structurally is closes BEAUTIFULLY. If you know how tricky doors can be to install, the "open" and "close" really determines the accuracy of measurements and levelness (if that's a word) of a structure.
I am including Oliver's contact information if you are in need of a metal tradesman. Note: Oliver did not ask for me to write this or is compensating me for writing it (though he did offer!). He is really just that good. Contact through Craigslist Here. Or through his website Here.
I wish the weather wasn't so hot. I am eager to keep the wood entry door open all the time so I can look at it from the inside.....but, that would be a wasted foolish expense! An Arizona November cannot come soon enough. I'll just keep walking outside to look at it from the street.
Thanks, Oliver! You are an artist!
Also, if you would like contact information in Arizona for wood window shutters or home security systems feel free to email me.
Monday, June 3, 2013
Border Stripe Twin Duvet Cover DIY (with added monogram)
Well, this was supposed to be some awesome DIY tutorial (refined version of the Olatz Copy Cat HERE) about twin duvet covers. But, alas, when I upgraded some new software on my computer it mysteriously ate the last years worth of my photos, including all the ones covering my process for the twin duvets. So, if you are looking for a Border Stripe Duvet Cover you can gander over HERE at this tutorial in a king size. This project was much easier than the Olatz one because 1) it is my second time making a duvet 2) the size is smaller and 3) I took the TWO border stripes straight down the sides to the end. In the Olatz copy cat I made joined the borders together with a third making a kind of rectangle.
What I used for this project are as follows:
4 White Twin Mainstays Flat Sheets from Walmart $4.47 (you may have to peek in a few Walmarts as inventory is scarce. Perhaps people are catching on a pretty great material for a low price)...or alot of people need twin flat sheets in white. I originally bought Ikea flat sheets, when I took them out of the package they were super thin-see through and overall cheap. The Walmart sheets are higher quality for about $0.50 more.
Border Material. I used another Walmart Mainstays Sheet in beige that was leftover from my Peshtemal Towel Pillow Project Here.
Coordinating Thread (White & Beige for me)
Zipper or Whatever kind of closure you prefer for the opening.
Total Cost Was $12 per Duvet Cover (without the Monogramming). Monogramming was $7.50 per Duvet making it just under $20 per Duvet!
And, Here is how they turned out!

And, here is a before.


And, I thought I might include a few shots of the Monogrammed Pillows on our bed. I found this gal through the Yellow Pages (online) who is located a few blocks down the street from me. She has a Monogram machine the size of a large SUV in her home. I asked her how much something like that cost, and let's just say you could buy two actual suvs for the price paid over the last 10 years! I showed her a few pictures of what I was looking for. Generally a Monogrammer will charge a base price of $6.00 (which is good for about 20,000 stitches) and charge per stitch after that. Our euro pillow shams cost $6.00 a piece and the boy's duvet covers were $7.50 a piece.
Here is a Before. The shams were clearance at Ikea for about $3.00 a piece. Up close, they are white (obviously) with a light grey blue stripe and dot pattern.


I think it is the southerner in me that hearts monogrammed pieces. Growing up we had our names/initials on our backpacks, cheer bags (don't laugh), socks shirts.... Too much monogramming can be overkill, I know, but I think a little really adds a nice tailored element to a room.
And. Now you know all my family's initials. Yay.
It is summertime, y'all!
Saturday, May 11, 2013
Peshtemal Towel Pillows!! With DIY Piping.
Do you remember the Turkish Towels I purchased HERE?
I loved the material so much that I decided to make a few pillows out of them!


Here is what I started with:

Now, you may ask, "why cut up a beautiful towel and not just purchase some striped beige and white fabric?" Well, 1) I was really torn about cutting them up....heh heh "torn" 2) I love the feel of this fabric And, 3) I could not find this size stripe for the life of me. I specifically wanted about a 1/2 inch stripe....not a quarter and not an inch or 2 inch. The 1/2 inch seemed to be such a nice medium between modern and traditional. Just to note: I am using the excess towels scraps to make two hand towels and a few wash cloths.....
I wanted to give them a more tailored look by adding coordinating piping. The piping was also useful in drawing a distinct contrast between the differing back (a white Walmart Mainstays Flat Sheet) and front material (The Towel). I chose to go this route because of cost. The towels come out to be about $15 with shipping from Turkey and the flat sheet was $4.47. I used a total of Two Towels and One Flat Sheet for Two Throw Pillow and Two Euro pillows, which comes out to be about $9.00 per cover (total cost, not including inserts).
The piping is made out of another Mainstays Flat Sheet in beige.
I cut about a (4) 2 1/2 inch wide strips on the flat sheet. No need to cut the whole length of the strip, just cut about 4 inches up from the bottom and tear the rest of the way.

Fold your strips around the cording.

And, sew as close as you can to the inner cording.

I used about 10 yards of cording.


We then look out the dining room window and see this:

Look closer.......DUCKS!

Back to the pillows:
Then I pinned and sewed my piping around the towel fronts. If you need more of a detailed tutorial on piped pillows view my post HERE.


I made these pillows "envelope style" because I didn't want to deal with zippers. There are many great tutorials out there on easy envelope pillows.
What is great about these, though, is I did not have to finish those inner seams. I just used the existing factory seams on the sheet.

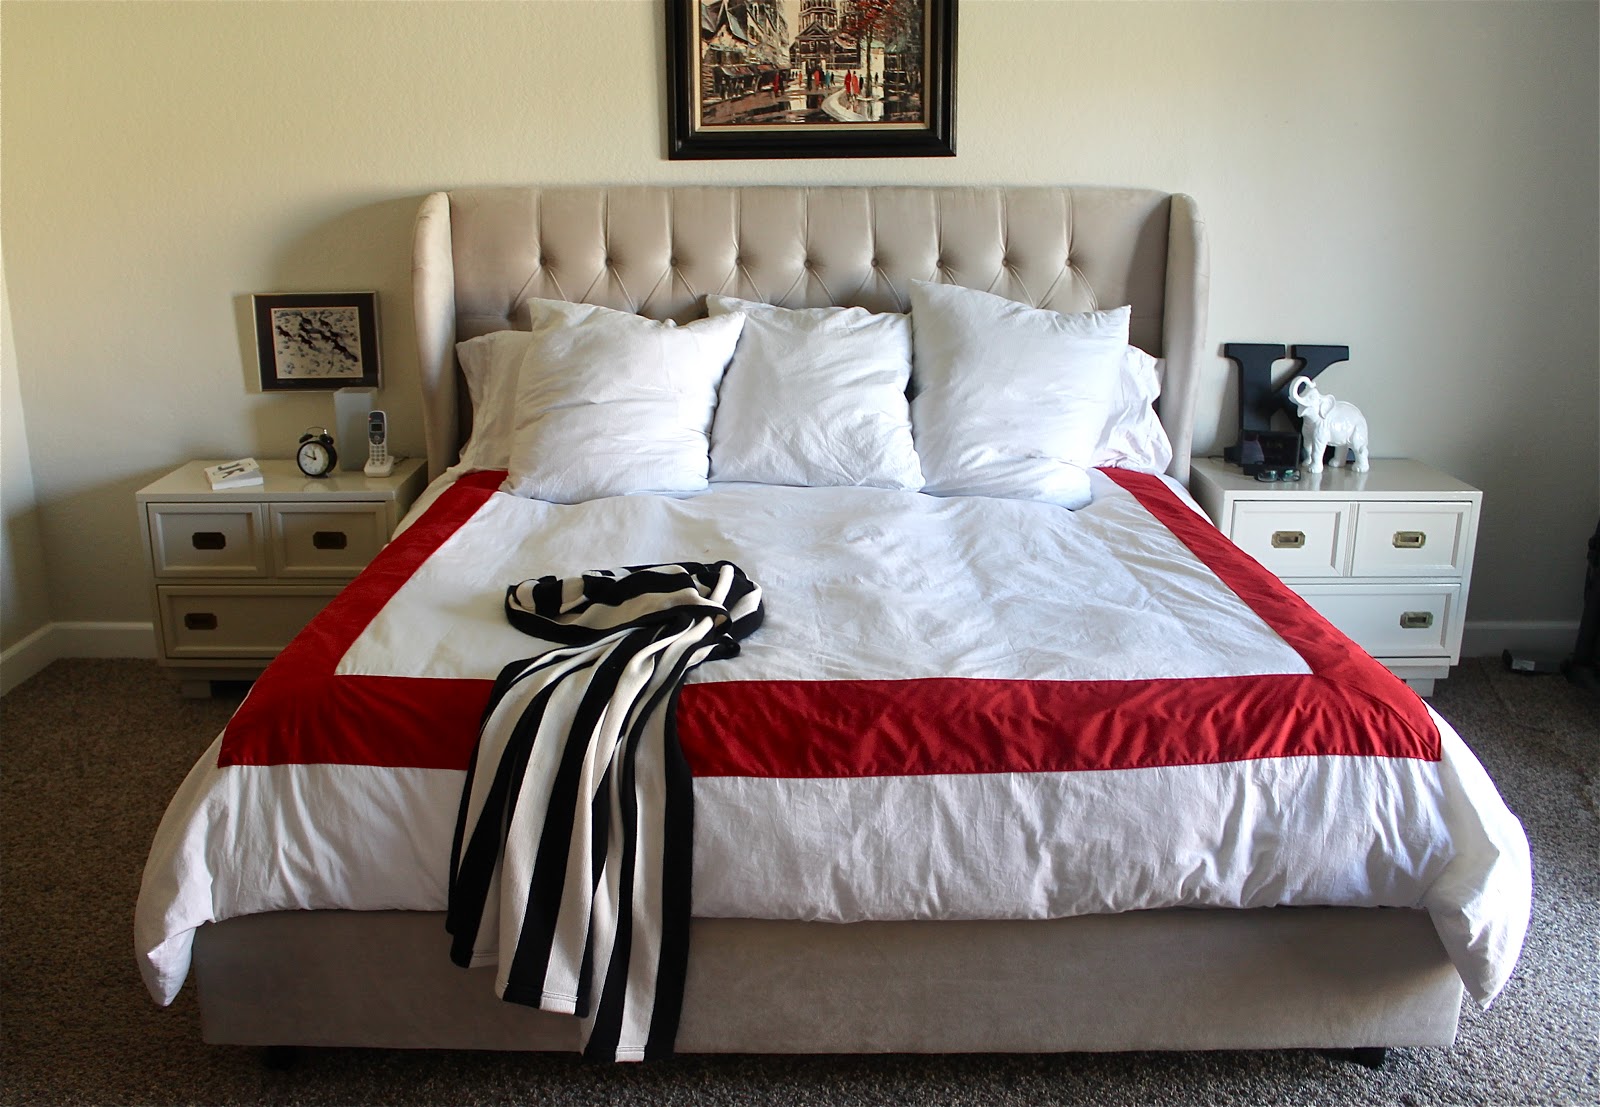
And, here are the throw pillows for our bed.

No Shams on those three Euro pillows in the back. Those will be coming up in my next post.

And, Here are the Euro pillows I made for the boy's beds.

Here is a shot of the back. Can you see the finished factory seam on there? Easy!!


I think he likes it ;) This was immediately after I finished up late at night.


Start with This:
End with This.

Up Next are some coordinating Duvet covers for the boy's beds.
Happy Mother's Day Weekend, Mommas!

Subscribe to:
Posts (Atom)